There are few things as frustrating as perfecting a stunning bold eye look or a fresh-faced no-makeup makeup look only to have your hard work derailed by clumpy mascara. Unfortunately, it’s a frustration most of us know all too well. While it’s sometimes possible to fix clumpy mascara (without starting your look from scratch), that’s not always the case. And let’s face it: Most of us don’t have the time in the morning to remove our eye makeup and start fresh. To help you avoid this common makeup mishap, we’re spilling the details on what causes clumpy mascara. You’ll also learn a few helpful tips for fixing clumpy lashes and advice on how to apply mascara smoothly and evenly to keep clumps at bay.
What Does Clumpy Mascara Look Like?
When mascara clumps, it can cause your individual lashes to stick together, creating an unpleasant spidery effect. Additionally, the base of your lashes may look heavy or weighed down, and your lashes overall will look thick and bulky rather than soft and wispy. Clumpy mascara can also cause your lashes to lose their curl, which may make your eye look droopy.
While there are some looks that pair well with messy, clumpy mascara (looking at you, ‘90s grunge), those cases are few and far between. If it’s not your intent to make your mascara clumpy, it can be frustrating to deal with. Thankfully, there are ways to help prevent (and, where prevention isn’t possible, fix) unwanted clumping.
What Causes Clumpy Mascara?
If the description above confirms that your mascara has indeed clumped, you’re likely wondering “Why is my mascara clumpy?” The truth is, there isn’t just one cause—there are a handful of factors that can cause your lashes to look overloaded. Here are the most common:
1. Applying too much mascara
Layering on too much mascara is often the main culprit for clumps. While you want to build up your mascara until you get your desired look, remember there’s a fine line between layering and caking on. If you add more than three coats, you could quickly enter clumpy territory.
2. Using expired mascara
Did you know mascara comes with an expiration date? Every time you open and pump that wand into the tube, you’re letting air in—which, over time, can dry out your mascara and cause it to break down. Always look at what’s known as the PAO (period after opening) for your mascara and mark the opening date somewhere on the product so you know when it’s to toss it. If a product smells ‘off,’ is starting to get discoloured, or is unusually sticky or clumpy, it may be time to discard it. When in doubt, toss the tube and swap it for a fresh one.
3. Applying mascara over old makeup
If you have residue from a previous makeup application still sitting on your lashes, you’ll likely get clumps if you add more mascara. Always be sure to remove your old mascara thoroughly before applying a fresh coat.
How To Fix Clumpy Mascara
In some cases, it’s possible to fix (or at least, improve the appearance of) clumpy mascara. Before starting your look from scratch, try these three techniques to help reduce clumping.
1. Use a clean spoolie to brush it out
If your mascara clumped up because you applied too many coats, grab a clean, dry spoolie and comb through your lashes before your mascara has a chance to dry. This will help lift some layers and separate your lashes to help break up any chunks or clumps.
2. Add micellar water to loosen it up
Once mascara is dry and clumpy, it’s a little harder to remove. But micellar water can help reduce some of the clumpiness. Grab a clean spoolie brush and dip it into micellar water, then brush it through your lashes from root to tip. You should see a few layers of the mascara disappear from your lashes.
3. Use a makeup remover wipe
Sometimes, you just need to remove the mascara (like if it’s expired). That doesn’t mean you have to ruin all your makeup and start over, though. Grab a makeup remover wipe and gently sandwich your lashes, then dab and wipe the mascara until you get it all off. Once your lashes are dry, you can re-do your mascara application.
9 Ways To Avoid Clumpy Mascara
While it’s nice to know how to fix clumpy mascara, it’s even better to know how to prevent clumping in the first place. Read on to find out how to apply your mascara properly and avoid clumpy, weighed-down lashes.
1. Avoid putting too much mascara on the wand
Most mascaras come with a little grip insert to ensure that the spoolie (in other words, the mascara brush) has the perfect amount of product after you dip it into the tube. Unfortunately, there are instances where too much product builds on the wand regardless of the insert. If you ever find your brush too coated, wipe it against the edge of the mascara tube to rid yourself of the excess product before swiping it through your lashes.
2. Build your coverage slowly
Clumps can form when you apply coat after coat of volumizing mascara, especially if it’s fiber-based. Since you don’t want a clumping catastrophe on your hands, it’s essential to build slowly, wait, and add more when needed to ensure you’re not overdoing it.
If you’re hoping for a fanned-out, wide-eyed look, try L’Oréal Paris Voluminous Panorama Washable Mascara. The multi-level brush grabs even the tiniest lashes to evenly coat every lash in just a few swipes, and the formula provides that clump free volume.
3. Opt for a buildable mascara
If you want super bold, dramatic lashes, you’ll probably want to apply more than one coat of mascara. In that case, it’s best to opt for a buildable mascara. The best non-clumping mascaras are lightweight, easy to apply, and feel comfortable on the lashes—and the L’Oréal Paris Lash Paradise Big Deal Buildable Mascara fits the bill. This lightweight formula is designed to be clump-resistant, no matter how much you layer it. Plus, the unique cross-conic brush ensures maximum separation of your lashes for a fluttery, wispy look.
4. Prime your lashes
If you don’t use a makeup primer, you risk your finished makeup looking less than perfect. Similarly, if you want your lashes to look their best and go the distance (without flaky, runny mascara by night’s end), you should start with a lash primer, like the L’Oréal Paris Lash Paradise Primer. The silky smooth formula enriched with jojoba oil and vitamins primes the lashes for mascara wear. Swipe it through your lashes from root to tip—just be sure to give it adequate time to dry before swiping on your mascara of choice.
5. Switch up your application method
While the technique for applying mascara to your top lashes is pretty straightforward—start from the base and brush through to the tips—using it on your lower lashes is different. That’s because when working with ultra-short, wispy lashes like the ones on the bottom, it can be challenging to brush them out. Use a delicate zig-zag motion to adequately coat your lashes and get as close to your lash line as possible without clumping or smudging.
6. Start with a clean canvas
You might think you’ve removed your makeup, but clumpy lashes may reveal the harsh truth. Since mascara is one of the most stubborn makeup products to remove (especially if it’s waterproof), you might find residue on your lashes that could lead to clumps. The best way to achieve a clump-free finish is to start with a clean base. So before applying any eye makeup, soak a cotton pad with micellar water or eye makeup remover and gently swipe it over your eyes to remove every trace of mascara residue.
7. Be choosy with your formula
One of the best ways to avoid clumping is to find a mascara that suits your needs. This can help ensure you’re able to get the results you’re after without having to pile on coat after coat of product.
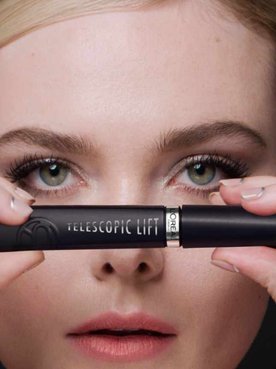
For example, if you’re already blessed with uber-long lashes, opt for something volumizing like L’Oréal Paris Voluminous Lash Paradise Washable Mascara. It’ll add the volume you crave without making your lashes appear overly long or costume-like. On the flip side, if your lashes are short but thick, you may want to consider a lengthening mascara, such as the L’Oréal Paris Telescopic Original Mascara, which enhances lashes with intense length.
8. Replace your mascara every few months
As we mentioned above, mascara does expire—usually within three to six months, though it depends on the formula. If you’ve noticed that your favourite mascara seems to have dried out or it starts to feel gummy on the wand, smells funny, or looks discoloured, it’s probably expired. And if you’re unsure, just toss it and replace it—where your eye area is concerned, it’s definitely better to be safe than sorry.
9. Use a lash comb
A simple and inexpensive lash comb can be a game-changer when achieving long, defined lashes without clumping. Mascara can sometimes go on unevenly, leading to clumps and product buildup on some regions of the lashes. Running a lash comb through them helps distribute the product more evenly from root to tip. Just be sure to use the comb before your mascara dries or you may risk pulling out your lashes.